
Topography And Wave Training Program with Technical Support

Customizing Topography Screen Views
While optional, we suggest that you complete these steps as they have been found to be the most common setup options for most people.
This will also allow you to familiarize yourself with the Options settings and tailor your screen view to your personal preferences.
Please make changes with no maps displayed.
You can open a map and check results after you have clicked OK in the Options window.
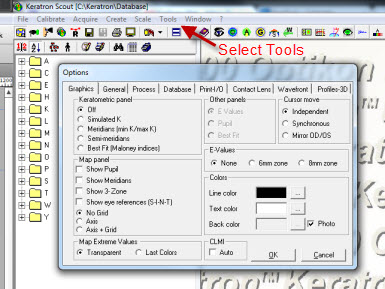
Click on Tools and then select Options
Customizing Screen Views
(Optional) These have been found to be the most popular settings for screen views.
1. Start the Topography Software and click the ‘AZ” button, (second from the left on the second menu bar).
2. At the top menu bar click “Tools” then “Options”.
3. In the “Options “ window under the tab “Graphics” in the “Map Panel” section click the check boxes for “Show Pupil”, “Show Meridians”, “Show 3-Zone”, “Show eye references” (S-I-N-T)
4. In the “Cursor Move” panel click “Synchronous”.
5. In the “E-Values” panel click “8mm zone”.
6. Click the “General” tab and at the bottom in the “Privacy output data” pane, uncheck the “Ask for privacy output” checkbox.
7. Click the “Process” tab. In the “Repeatability Check” panel click “After Process All…” checkbox. In the “Default View” panel click the drop down arrow at “Borders”. Select “Rings”.
8. In the “Move axis resolution” panel select “High”.
9. Click the “Database” tab. In the “Database Explorer” panel click the check box at “Single click to open”. In the ”Alpha order” panel click “Test Date”. In the “Chrono order” panel click “Test Date”.
10. Click the ”Print-I/O” tab. In the “Port type” panel select the type of port that will be used for communication between the computer and the Scout. (Usually USB.)
11. Click the “Contact Lens” tab. In the “View” panel click the check boxes for “Show Pupil” and “Show Tilt Buttons”.
12. Click the “Wavefront” tab. In “Wavefront Map Overlay” panel select “Show Pupil”, “Show Meridians”, “Show 3-Zone”, “Show eye references…”, “No Grid”. Leave “Colors” panel as is.
13. Click the “Profiles & 3D” tab. In the “Profile Type” panel select “Meridians”. Click “OK” at the bottom of the “Options “ window.
Click HERE for Topographer Calibration Instructions.